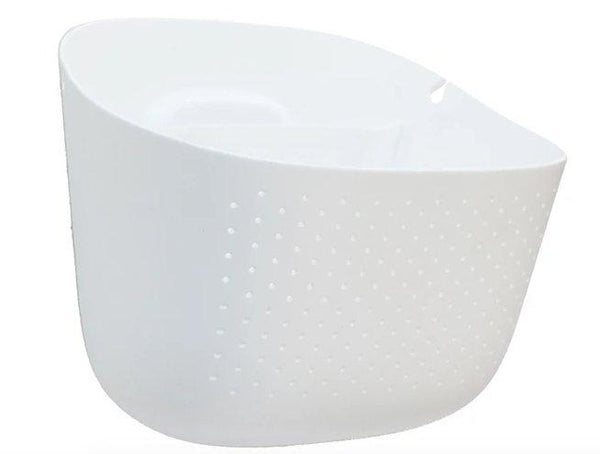
SKU: 39896215188
woolly pocket plastic wall planter

woolly pocket plastic wall planter Living wall planters by WoollyPocket-Outdoor/Indoor Planters

Sale price$23.10 Regular price$25.67
Save 10%

Pay in installments of $6.42 with ShopPay, AfterPay and Klarna

Shipping Estimate
USA
  • USA
  • CAN

Ships within 48 hours · Estimated delivery Jul 17 - Jul 22

Promo Codes Available:

For Your Every Summer RSVP, with Code: SUMMER15

Description

woolly pocket plastic wall planter Living wall planters by WoollyPocket-Outdoor/Indoor PlantersThese wall planters make building your own living wall simple. They are self watering and are made from 100% recycled materials. They are quite large so you can easily fit two or three medium size plants into 1 planter. Each planter comes with all the necessary parts you need to hang it. Just bring a bit of creativity and have fun seeing your creation come to life! *please note that each planter is a minimum of 20$ shipping charge that you will be

These wall planters make building your own living wall simple. They are self watering and are made from 100% recycled materials.

They are quite large so you can easily fit two or three medium size plants into 1 planter. Each planter comes with all the necessary parts you need to hang it. Just bring a bit of creativity and have fun seeing your creation come to life!

*please note that each planter is a minimum of 20$ shipping charge that you will be billed after your order unless you order over 150$ . Any questions please let me know local delivery is exempt form these charges:) 

Details:

• Dimensions: 13” H x 18” W x 8” D

• Soil Volume: 0.50 ft3

• Plant Capacity: (2) 6” plants & (1) 8” plant

• Max weight: 50 lbs

• Hardware Supplied: Self tapping #8 screw & poly ribbed insert

• Water Tank Anchor Points: (template supplied)
- 9” Horizontal & 13” Vertical

• Planter Anchor Points:
- Planter hooks to back of Water Tank for easy plant exchange

• Irrigation Supply Placement: (optional)
- Vertical supply channel = ½” or ¼” supply line
- Water tank = ¼” supply & drip line

• Recommended Drip Line: (optional)
- ¼” inline emitter, 6” spacing
- 2 emitters/planter
- 20 psi / .52 gph
- Max length of run = 19 planters


1-2-3 Hang It Up! (Tips to Install Wall Planters)

1. Attach Tank
Attach self-watering tank to wall using included hardware. Place lid on tank.

2. Plant & Hand Water
Fill planter with plants and soil up to the soil level line. Hand water thoroughly to prim planter and establish roots (Note: When hand watering, watering, water will seep through breathable vents evenly across the front of the planter, carefully dry planter before hanging.).

3. Hang Planter
Slide planter loops up behind and onto tank hooks. (Hint: Look down irrigation supply channel to see loops and hooks.) From now on, use watering holes for watering.


Build Living Walls

These planters are totally modular. Create living walls of almost any size, indoors or outside. Calculate how many wall planters you’ll need by dividing the width of your wall area by 18” and height by 13”. Use the box as a horizontal template to help you mark holes. Example: Four planters cover a 36” W and 26” H wall area.

Visit WoollyPocket website for more tips and tricks!


Smart Watering

Fill the self-watering tank through the watering hole. Tank will allow water to trickle down to plant roots and fill reservoir. Breathable vents help soil naturally aerate and wick water up to roots until reservoir is empty.

(Note: If water seeps through breathable vents then planter is overwatered.)


Drip Irrigation

For large installations, it's recommended to use automatic drip irrigation.

1/4” emitter lines fit inside the watering tank, emitting water evenly down to roots and reservoir.

Supply lines hide neatly in the irrigation supply channel located on the left and right sides of every wall planter. The complete drip kits may be purchased from woollypocket.com


Choosing Plants

Choose plants that are best for your growing conditions considering natural or artificial light, temperature, etc. Purchase approximately three full sized 6-inch plants or one full sized 8-inch plant.


For stunning living walls, we suggest combining three types of plants:

1. Spillers – plants that hang
2. Fillers – plants that cover
3. Thrillers – exciting plants


Shipping Notes
  • Free Standard Shipping on $100+ Orders to the USA.
  • Except Preorder products are shipped in 48 hours.
  • Delivery to the USA:
  1. Standard Shipping : 3-10 business days
  • If time is of the essence, please consider selecting expedited delivery for faster service.
Exchange/Return Notes
  • We offer a 30-day return/exchange service after receiving.
  • Final sale items are not eligible for returns or exchanges.
  • To process your return/exchange, please contact us at [email protected]
  • Please click here for more details>>> Return & Exchange Policy
SKU: 39896215188

Discover Niche Categories That Outsell woolly pocket plastic wall planter

Top-Converting Item to Boost Your Average Order

4.4 ★★★★★
Based on 13 reviews
Sort
Highest Rating
Newest First
Oldest First
Product Reviews
T
Verified Purchase
Talagand
Birmingham, US
★★★★★ 4
Reasonably adequate room divider
Size: 4 Panel-88'', Color: Beige
I'm reviewing this as I assemble it. Couple things: 1. I didn't expect as much assembly. I've ordered dividers before and they more-or-less came as one unit. Sometimes the panels needed screwing together. These require complete assembly and come largely as three rods: two make up vertical columns and snap together. Another one (called part "C") makes the horizontal columns and you have two of these per panel (one attaches to part "A" and the other part "B"). These parts are metal with a plastic shim. Using the wood screws to attach to part "C" is a real pain in the neck. There's not much holding the panel in place so it's a little tricky. One tactic I've found while I'm assembling that works for the initial connections from parts A and B to their respective "C" rods is to hold the screw in place with a screw driver and then rotating the rod around the screw. This will do a number on your hands if you aren't wearing gloves. This obviously doesn't work when completing the connection. Using a driller driver on this is really near impossible because there isn't anything you can use to secure it in place. You can use it on the first panel, but as it gets longer, it becomes increasingly difficult and because it isn't wood, it's really tight. I considered drilling larger pilot holes but since there are only 4x4=16 screws I need to screw in, I just decided to use my screw driver to complete it. 2. Also related to assembly. When completing the panels (attaching parts "A" and "B" to parts "C" that have the cloth cover on it), you have to be careful that when you tighten that side that it isn't loosening the other side. Because the pilot holes are so tight, you can end up rotating the rod, which rotates it in the same direction as looser on the original side. Having someone hold the "C" rod in place while you screw it in is probably the easiest approach. I didn't have a 2nd person, so I just had to keep flipping back and forth and tightening both sides as I screwed it in. Not the worlds biggest deal, but annoying nonetheless. 3. The way the instructions are written, they seem to suggest building this thing progressively; that is, you do panel 1, then 2, connect them together, then do 3 and connect it, etc. I took a different route that I suspect saved me quite a bit of trouble, and I assembled all four panels first and THEN connected everything together. 4. For the love of God make sure you check that the plastic tip is on the same side for every panel. Otherwise, you have to take one side apart again and reverse it. On the bright side, if this happens, you've essentially bored out the pilot holes to be the correct size... which is having me question if I shouldn't have just bored them out to the appropriate width in the first place. 5. Attaching all of the panels together is also an enormous pain in the ass unless you happen to have an 88" long elevated surface. Attaching the legs either requires you to elevate one side, which will invariably twist the inexplicably cheap material in the bottom connectors... or you can attach them sideways... or you can put this thing upright, having two people hold the panels in place while you use the allen wrench to tighten the bolts on the underside. None of those are particularly great options. NOW on to the utility itself. 1. The panels do let some light through (I didn't believe their advertising, and that was one of the reasons that I bought beige, is that I wanted it to not be too dark). They aren't transparent though, so it isn't that far off from their description. They functionally work great, and keep the mess of wires hidden and when I'm sitting at my desk, actually reflect quite a bit of light into my office. Great! 2. My wife has described these as "the most hideous piece of furniture ever conceived of by man." So it does not have spouse approval factor. Granted, she will seldom be in my office area, so that isn't the end of the world. 3. These are really hard to align in a way that doesn't look a little tacky. There are some plastic connectors but they don't do a bang up job of keeping these in place. Each panel is slightly tilted and it's... quite obvious. I may at some point make my own improvements to these to help make them more level. It's not a particularly expensive product so I wasn't expecting much so it's fine and I'm not going to ding them on the rating because of it. All said, would I buy this product again? Probably not. It's assembly was ~90 minutes which is about 75 minutes longer than I was anticipating spending on this (not including the 5 minute writeup that I'm doing here). But am I going to return it? Also no, if for no other reason I'd be just as annoyed taking it apart and putting it in the original box to return it.
WAS THIS REVIEW HELPFUL?YesReportShare
Reviewed in the United States on October 31, 2023
A
Verified Purchase
Andy Sims
Massapequa, US
★★★★★ 5
better then expected
Color: Black
very easy to put together works perfectly! very stable for the side would buy again!
WAS THIS REVIEW HELPFUL?YesReportShare
Reviewed in the United States on May 21, 2026
Y
Verified Purchase
Yuliet carreño cutiño
Chelsea, US
★★★★★ 3
Divisor de habitaciones
Color: Black
La entrega fue perfecta , si debo de decir que en la descripción del producto decía que media 72 ancho x 72 alto pero no fue así su ancho es de 60 .
WAS THIS REVIEW HELPFUL?YesReportShare
Reviewed in the United States on September 6, 2025
N
Verified Purchase
Nana rice
Grantham, US
★★★★★ 5
Good purchase
Color: Black
We used this screen to divide the beds at a hotel. It gave the perfect privacy, was easy to put up and very sturdy
WAS THIS REVIEW HELPFUL?YesReportShare
Reviewed in the United States on April 21, 2026
K
Verified Purchase
Kaylin
Whiting, US
★★★★★ 1
Would not recommend
Color: Black
Product was terrible, it was not sturdy at all
WAS THIS REVIEW HELPFUL?YesReportShare
Reviewed in the United States on May 21, 2026

recommand products