Pay in installments of $6.82 with
 ,
,
 and
and

Shipping Estimate
USA
- USA
- CAN
- USA
- CAN
Ships within 48 hours · Estimated delivery Jul 31 - Aug 5
 Promo Codes Available:
For Your Every Summer RSVP, with Code: SUMMER15
Description
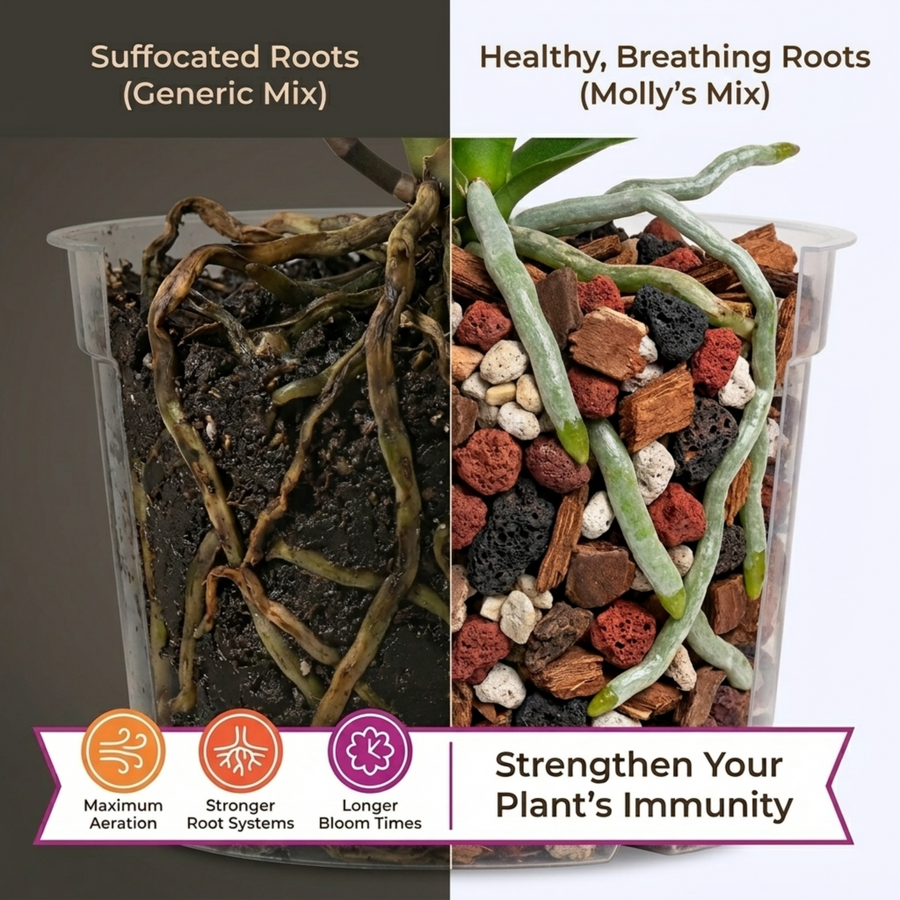
can orchid potting mix be used for succulents Molly's Bark-Based Mix for OrchidsQuick answer: what is Molly's Orchid Mix? For: Phalaenopsis, Cattleya, Oncidium, Dendrobium, Vanda, and every other epiphytic orchid. What's in it: coarse fir bark, horticultural charcoal, perlite, and sphagnum accent. No peat moss, no soil. Why it works: orchids are epiphytes. In the wild their roots grip tree bark, not dirt. The chunky bark structure mimics that native environment, drains in seconds, and lets roots breathe. Holds shape for 12 to 18
Quick answer: what is Molly's Orchid Mix?
- For: Phalaenopsis, Cattleya, Oncidium, Dendrobium, Vanda, and every other epiphytic orchid.
- What's in it: coarse fir bark, horticultural charcoal, perlite, and sphagnum accent. No peat moss, no soil.
- Why it works: orchids are epiphytes. In the wild their roots grip tree bark, not dirt. The chunky bark structure mimics that native environment, drains in seconds, and lets roots breathe.
- Holds shape for 12 to 18 months. Most bagged orchid mixes break down to fines in 6 months and start to rot roots from below.
- Pre-rinsed so you can pot straight from the bag without leaching salts.
More orchid-specific guidance: Do orchids need soil?, Best potting mix for orchids: complete guide.
Orchids are not soil plants. In nature most cultivated orchids are epiphytes, growing on tree bark with their roots exposed to air, catching rain and humidity. Pot them in regular potting soil and the roots suffocate, rot, and the plant dies, often within a single watering cycle. The right orchid potting mix is bark-based, fast-draining, and air-rich.
Molly's Orchid Mix delivers exactly that. Coarse fir bark as the structural base, horticultural charcoal to keep the mix sweet, plus a light proportion of moisture-retaining organics so roots don't dehydrate between waterings. Built for the way orchids actually grow.
What is orchid potting mix?
Orchid potting mix (sometimes called orchid pot mixture, orchid soil, or orchid potting medium) is a chunky, soilless growing medium made primarily from bark, charcoal, and small percentages of moisture-retaining materials. Despite the name, real orchid potting mix contains no actual soil. The "soil" in those product names is a marketing convention, not a description of what's in the bag.
A proper orchid potting mix should:
- Drain almost immediately when water is poured through it
- Hold its chunky structure for 1 to 2 years before breaking down
- Allow constant air contact with the roots between waterings
- Contain no peat, no garden soil, and no compost as primary ingredients
If a product labeled "orchid soil" feels heavy and dense out of the bag, it's the wrong product. A real orchid mix feels chunky, light, and rough.
What's in the bag
- Coarse fir bark: the foundation. Mimics the tree-trunk substrate of wild epiphytes, providing the air pockets and grip orchid roots evolved for.
- Horticultural charcoal: absorbs salts and impurities. Critical for orchids because they're sensitive to mineral buildup from tap water.
- Coir chips: a small percentage of moisture buffer between waterings. Without some moisture retention, you'd be watering daily.
- Sphagnum moss (light proportion): retains humidity right at the root crown. Especially important for Phalaenopsis grown in dry indoor air.
Low organic content overall, no soil, minimal peat. The roots stay dry between waterings, then drink fast when watered.
Genera this is for
Designed for epiphytic orchids:
- Phalaenopsis (moth orchids): by far the most common houseplant orchid. This mix is dialed in for them.
- Cattleya, Oncidium, Dendrobium, Vanda: all bark-loving epiphytes that thrive in this mix.
- Brassavola, Encyclia, Miltonia: same family, same care.
Not for: terrestrial orchids (some Cymbidium, Paphiopedilum lady slippers, Bletilla) which prefer a soilier substrate. For those, blend this mix with a small amount of fine bark and worm castings, or contact us for specific recommendations.
Comparing your orchid potting mix options
| Option | Cost / 5 qt | Effort | Result quality |
|---|---|---|---|
| Bagged "orchid soil" from box stores | $5 to $10 | Low | Inconsistent. Often too fine, sometimes contains soil or peat. |
| DIY blend (bark + perlite + charcoal) | $15 to $25 with leftover ingredients | Medium. Source 3 to 4 ingredients, mix to ratio, pre-soak the bark. | High if you get the ratios right. Steep first-time learning curve. |
| Molly's Orchid Mix (this product) | ~$22 | None. Open and pot. | Consistent. Calibrated for Phalaenopsis, Cattleya, and Dendrobium. |
The honest comparison: bagged "orchid soil" from box stores is a coin flip. Some products are good, many are repackaged peat-based potting soil that will kill an orchid. DIY makes economic sense if you grow many orchids and don't mind the upfront sourcing work. Pre-blended is the right call for everyone else, especially if you've already lost an orchid to wrong soil.
Sizing & coverage
One 5 dry quart bag of Molly's Orchid Mix fills approximately:
- About 10 four-inch pots
- About 6 five-inch pots
- About 4 six-inch pots
- About 2 to 3 eight-inch pots
Most Phalaenopsis sold at supermarkets come in 5 or 6 inch pots, so a single bag handles 2 to 4 typical repots. Choose a pot just slightly larger than the existing root mass; orchids prefer to be tight in their pots.
When to repot
Repot every 1 to 2 years, or sooner if any of these are true:
- The bark has broken down into smaller chunks (it should still feel chunky, not mushy)
- The mix smells sour or stagnant
- Roots are climbing out of the pot in protest
- The plant has just finished a flowering cycle (best time to repot)
Avoid repotting an orchid that's actively spiking or in bloom. Wait until flowering ends.
Watering with bark mix (it's different)
Bark mix dries out faster than soil and rehydrates more slowly. Use the soak-and-drain method:
- Take the orchid to a sink. Pour room-temperature water through the pot until it runs out the drainage holes for several seconds.
- Let it drain completely (5 to 10 minutes).
- Return to its growing spot.
- Repeat when the bark feels dry about an inch down, typically every 7 to 10 days for Phalaenopsis indoors.
Never let the orchid sit in a saucer of water. Drainage is non-negotiable.
FAQ
Will this work for moth orchids (Phalaenopsis)?
Yes. Phalaenopsis is the primary use case. The bark + charcoal + light moisture-retainer ratio is tuned for them.
What's the difference between orchid soil and orchid potting mix?
None in practice. Both terms describe the same product: a chunky, soilless growing medium for orchids. "Soil" is the more common search term; "mix" is the more accurate description. The key thing is the ingredients on the bag, not the marketing word.
Is this the same as orchid bark?
Bark is one ingredient. Orchid potting mix is bark blended with charcoal, coir chips, and a small amount of sphagnum. Pure bark dries out too fast for most home growers; the moisture-retaining components in this mix prevent that.
Can I use regular potting soil if I add perlite?
No. Even with extra drainage, soil compacts and holds water against the roots over time. The structure is wrong, not just the drainage rate. Use a real bark-based mix.
How is this different from sphagnum moss alone?
Sphagnum holds way more water than orchid roots want long-term. Pure sphagnum is fine for transplant or recovery, but for ongoing growth, a bark-based mix prevents root rot. This mix has a small amount of sphagnum for humidity, anchored in chunky bark for drainage.
Can I make my own orchid mix?
You can. The trade-off is sourcing the right grade of fir bark (it should be coarse, sized 1/4 to 1/2 inch), pre-soaking it (raw bark is hydrophobic), and dialing in proportions. We did the work so you don't have to.
Is the mix already fertilized?
No synthetic fertilizer. Orchids are light feeders and bark-based mixes hold no nutrient charge. Use a dilute orchid fertilizer (look for "weakly weekly" recommendations, ~1/4 strength balanced fertilizer) during active growth, less in winter dormancy.
How long does the mix last in the pot?
Most home growers can leave Molly's Orchid Mix in place for 1 to 2 years before the bark breaks down enough to need replacing. Annual repotting is the cleanest discipline; signs that it's overdue include musty odor, water sitting at the surface, and visibly broken-down bark.
Can I reuse old orchid mix from a previous repot?
No. Once bark has broken down, it loses its structure and starts retaining water like soil. Always use fresh mix when repotting. Discard the old mix or compost it.
What pot size should I use?
Smaller than feels right. Orchids prefer to be tight in their pots. The new pot should fit the root mass with about 1cm of breathing room around it. Oversized pots hold too much moisture and rot the roots.
Packaged in a heat-sealed resealable bag.
Related guides
For deeper reading: the orchid care rhythm and the complete orchid potting mix guide.
Not sure which mix your plant needs?
Take our free 60-second Soil Finder quiz → Diagnose the problem and get the exact Molly's mix and amount for your plant, plus 10% off.
Shipping Notes
- Free Standard Shipping on $100+ Orders to the USA.
- Except Preorder products are shipped in 48 hours.
- Delivery to the USA:
- Standard Shipping : 3-10 business days
- If time is of the essence, please consider selecting expedited delivery for faster service.
Exchange/Return Notes
- We offer a 30-day return/exchange service after receiving.
- Final sale items are not eligible for returns or exchanges.
- To process your return/exchange, please contact us at [email protected]
- Please click here for more details>>> Return & Exchange Policy