SKU: 73986885122
succulent rock plant

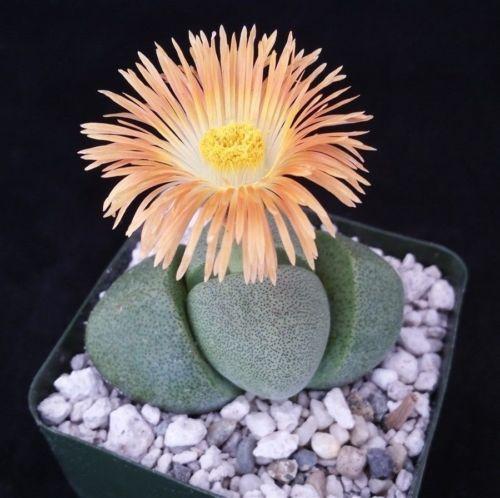
succulent rock plant Split Rock Succulent 'Pleiospilos nelii' mesembs 2.5" Pot

Sale price$26.35 Regular price$29.28
Save 10%

Shipping Estimate
USA
  • USA
  • CAN

Ships within 48 hours · Estimated delivery Jul 12 - Jul 17

Promo Codes Available:

For Your Every Summer RSVP, with Code: SUMMER15

Description

succulent rock plant Split Rock Succulent 'Pleiospilos nelii' mesembs 2.5" PotThe split rock succulent, known as Pleiospilos nelii mesembs, is an absolutely stunning succulent plant that belongs to the Mesembryanthemaceae family! "Mesembs" is a common term used to refer to plants in this family, which includes various succulents known for their unique adaptations to arid environments. The split rock succulent has several other common names, such as mimicry plant, cleft stone, or living rock cactus. It gets its name because its

The split rock succulent, known as Pleiospilos nelii mesembs, is an absolutely stunning succulent plant that belongs to the Mesembryanthemaceae family! "Mesembs" is a common term used to refer to plants in this family, which includes various succulents known for their unique adaptations to arid environments. The split rock succulent has several other common names, such as mimicry plant, cleft stone, or living rock cactus. It gets its name because its leaves split open, revealing a cleft in the center. It looks like a rock that has been split in half! 

The split rock plant and Lithops are often confused because of their striking similarities. The biggest distinction between the two is in how they blossom. Both plants bloom in the early fall, but Split Rocks produce multiple flowers in a single reproductive cycle, whereas Lithops only produces one flower at a time. The split rock succulent produces daisy-like flowers in a variety of colors, including orange, white, yellow, and magenta.

Native to South Africa, this egg-shaped succulent has two gray-green, thick, fleshy leaves that cleft down the center. New leaves grow at right angles to the split.It can typically grow up to 4 inches tall and 8 inches wide. This split rock plant also comes in the lovely Pleiospilos nelii "Royal flush" variety, which has deep purple to reddish foliage. 

In terms of propagation, split rock plants can be propagated through seeds or by dividing the offsets that grow from the base of the parent plant. Additionally, this split rock is a friendly plant for both humans and pets, making it a popular choice among plant enthusiasts. 

Watering Needs

When it comes to watering split rock succulents, it's important to remember that they have lower water needs than other succulents. These rock plants are adapted to arid environments, so they prefer infrequent watering. It's best to allow the soil to dry out completely between waterings to prevent overwatering, which can lead to root rot or bursting your concrete leaf plant. 

One helpful tip is to use the "soak and dry" method. This means thoroughly watering your split rock plant until water drains out of the bottom of the pot through drainage holes, and then waiting for the soil to dry out completely before watering again. This helps mimic the natural rainfall patterns these succulents are accustomed to. Remember, it's always better to go underwater than to overwater when it comes to split rock succulents! 

In addition to monitoring the soil moisture, it's also important to consider the environmental conditions. During the active growing season, which is typically spring and summer, split rock succulents may require more frequent watering. However, during the dormant period in fall and winter, they require less water. 

Remember, a healthy Split Rock typically has two sets of leaves. If it develops more than two sets or shows cracking on its epidermis, it's time to stop watering. Avoid watering for at least a week if you notice these signs. 

Light Requirements

When it comes to light requirements, split rock succulents thrive in partial shade to full sun. They prefer a sunny spot where they can receive ample sunlight, but it's important to protect them from intense, direct sunlight, especially during the hottest parts of the day. 

A great location for split rock succulents is near a south or east-facing window, where they can receive bright, filtered light throughout the day. Consider purchasing grow lights if your Split Rock can't get enough light from a south-facing window or any other location. These can provide the necessary light intensity and duration for healthy growth. Just make sure to position the lights at an appropriate distance from the plants to avoid burning or overheating. 

Remember, each plant is unique, so it's important to observe your split rock succulents and adjust the lighting conditions accordingly.

Optimal Soil & Fertilizer Needs 

When it comes to soil and fertilizer needs, split rock plants prefer a well-drained soil mix specifically formulated for succulents. This type of soil allows excess water to flow out easily, preventing root rot. You can find pre-made succulent soil mixes at your local garden center, or you can create your own by combining equal parts of potting soil, perlite, and coarse sand.

Here at Planet Desert, we have a specialty-formulated succulent potting mix that contains 5 natural substrates and organic mycorrhizae to promote the development of a strong root system that helps your succulent to thrive. 

As for fertilizing, Pleiospilos nelii split rock succulents have low nutrient requirements. It's best to use a balanced natural NPK fertilizer specifically formulated for succulents, and only apply once a year during the active growing season, which is typically early spring. Remember, it's better to under-fertilize than to over-fertilize, as excessive nutrients can harm these plants. 

In general, it's important to avoid overfeeding split rock succulents, as they are adapted to nutrient-poor environments. Too much fertilizer can lead to weak growth and other problems. Always monitor the health and growth of your plants and adjust the fertilization routine as needed. If the leaves start turning yellow or the rock plant appears stressed, it may be a sign of nutrient imbalance or over-fertilization. 

Hardiness Zone & More

Split rock succulents are typically indoor plants and generally hardy in USDA hardiness zones 9 to 11. They thrive in warm climates and can tolerate temperatures ranging from 50°F to 85°F. If you live in a region with extreme temperatures or higher humidity levels, you can still grow split rock succulents indoors or in a controlled environment, such as a greenhouse or terrarium, where you can maintain the ideal conditions for their growth. Just remember to monitor the temperature and humidity levels to ensure they stay within the recommended range. 

In terms of humidity, the rock plants are adapted to arid conditions and prefer low to moderate humidity levels. They can tolerate dry air and do not require high levels of humidity. In fact, excessive humidity can increase the risk of fungal diseases and rot. It's best to provide good air circulation around the split rock to prevent moisture buildup. 

Don't miss out on adding the Pleiospilos nelii - Split rock succulent to your garden! Order now and enjoy its beauty for years to come. 

Shipping Notes
  • Free Standard Shipping on $100+ Orders to the USA.
  • Except Preorder products are shipped in 48 hours.
  • Delivery to the USA:
  1. Standard Shipping : 3-10 business days
  • If time is of the essence, please consider selecting expedited delivery for faster service.
Exchange/Return Notes
  • We offer a 30-day return/exchange service after receiving.
  • Final sale items are not eligible for returns or exchanges.
  • To process your return/exchange, please contact us at [email protected]
  • Please click here for more details>>> Return & Exchange Policy
SKU: 73986885122

Discover Niche Categories That Outsell succulent rock plant

Top-Converting Item to Boost Your Average Order

4.1 ★★★★★
Based on 1034 reviews
Sort
Highest Rating
Newest First
Oldest First
Product Reviews
C
Verified Purchase
cwin
Chelsea, US
★★★★★ 5
Very happy with the outcome, worked perfectly
Size: 1 Count (Pack of 1)
I was very happy with the CERAKOTE Ceramic Headlight Restoration Kit. The instructions were simple to follow, and the whole process was much easier than I expected. My headlights were cloudy and dull before using it, but after completing the steps, they looked dramatically clearer and much closer to new. The kit included everything needed, and I liked that it did not require any extra tools or complicated equipment. The results made a noticeable difference in the appearance of the vehicle, and the headlights also seem brighter at night. Overall, this is a great product that does exactly what it claims. I would definitely recommend it to anyone looking for an affordable and effective way to restore foggy headlights.
WAS THIS REVIEW HELPFUL?YesReportShare
Reviewed in the United States on May 25, 2026
G
Verified Purchase
Gabrila
Louisville, US
★★★★★ 5
Highly Recommend – Amazing Results on My Honda Accords!
Size: 1 Count (Pack of 1), Size: 1 Count (Pack of 1)
I recently used the Cerakote Headlight Restoration Kit on both my 2008 and 2014 Honda Accords, and I’m genuinely impressed. The headlights on both cars were badly oxidized, hazy, and yellowed from years of sun exposure. After following the kit’s instructions, they look crystal clear and almost like new again. The process is pretty straightforward and beginner-friendly. It does take roughly an hour per headlight set if you follow all the steps carefully and allow proper air drying time before the final clear coat. There’s a bit of elbow grease involved with the sanding and polishing stages, but nothing overly difficult. The kit provides everything you need, and the instructions are clear. The results are excellent! Both cars now have headlights that look factory-fresh. I’m really happy with how bright and clear they are at night. Best part? I saved a ton of money by restoring them instead of buying expensive OEM replacements. The only minor uncertainty is long-term durability (how well the clear coat holds up after a couple years of sun, weather, and car washes), but for the price and the dramatic improvement I saw, it’s absolutely worth it. I’d definitely buy this kit again if needed. Highly recommended for anyone dealing with cloudy headlights. Great product that delivers professional-looking results at a fraction of the cost!
WAS THIS REVIEW HELPFUL?YesReportShare
Reviewed in the United States on May 3, 2026
C
Verified Purchase
Cleaver
Pawtucket, US
★★★★★ 4
Best product I've tried so far but still temporary. YMMV.
Size: 1 Count (Pack of 1)
This product really does work. It is the best I've used. I purchased in September 2024 and am writing this review in May of 2026, roughly one year and 8 months later. I noticed product failure a little after a year after application and it has been degrading slowly since. Currently the product is visible like a layer of clear paint flaking off and you can physically scratch some off. Here are the pros and cons. Pros: Clarity, relative ease of use, value Cons: Taping and sanding, doesn't last for as long as you own your car as claimed Best used as a temporary fix. Bottom line, would I use it again? Yes. What am I doing today? Replacing the headlights completely. Why? I plan on keeping my car for longer than a year.
WAS THIS REVIEW HELPFUL?YesReportShare
Reviewed in the United States on May 8, 2026
S
Verified Purchase
Sahiti
Charlottesville, US
★★★★★ 5
Review After Using on 3 Different Cars over 3 years
Size: 1 Count (Pack of 1)
Cerakote Headlight Restoration Kit : After Using on 3 Different Cars over 3 years This is my second time purchasing the Cerakote Headlight Restoration Kit, and I’ve now used it across three different vehicles. At this point, I feel comfortable saying this product genuinely works when used correctly. Before trying this kit, I considered replacing my headlights entirely. The cheapest replacement set I found was around $150 just for the parts. Installation would have required removing the grille, bumper, and other components, which adds time and complexity. For an older vehicle, that didn’t make financial sense. Instead, I chose to restore the original headlights. Cost and Value My first package cost me $17, and I restored two cars with that single kit ( about 9$ per pair). That alone made it worth it. For under $20: I restored two separate vehicles Avoided buying new headlight assemblies Avoided removing the bumper and grille Compared to a $150+ replacement plus labor, the savings are significant. Durability 1 year+ under direct Cali sunlight (currently on year 2 and still good) First Car – Learning the Process The first time I used the kit, my results were decent but not perfect. That was mainly because I didn’t fully understand how sanding and polishing actually work. ( this reoxidized fastest under 8 months, but it was mostly my fault) I didn’t initially realize: The headlight needs to stay wet during sanding Oxidation must be completely removed before applying clear coat Even pressure matters/ 50% overlap coverage when appling ceramic Once I understood that sanding is the most important step, everything improved. Second Car (beater) Major Improvement The second vehicle was heavily oxidized and yellowed. I used the remaining material from that same $17 kit and restored it completely. The clarity difference was dramatic. It looked close to factory condition, and night visibility noticeably improved. That was when I realized the product itself is solid; the key is proper technique. Third Car ; Recent purchase By the third car, the process felt straightforward. I followed the instructions carefully, kept the surface wet while sanding, and applied the clear coat evenly in one smooth pass. The final result was clear, glossy, and uniform. No haze, no streaking. Durability On my first vehicle, the restoration lasted close to a year perfectly( I sold that car this year and it still had clear headlights), and that car was parked outside in direct sun most days. For a DIY kit at this price point, that level of durability is impressive. Final Thoughts I seriously considered spending $150 on replacement headlights( this was cheapest ) and dealing with removing body panels. Instead, I spent $17 and restored two cars. Now having used it on three vehicles, I can say this kit is effective, cost-efficient, and worth the time if you follow the process properly. It does require effort and patience, but the results justify it. I would purchase it again.
WAS THIS REVIEW HELPFUL?YesReportShare
Reviewed in the United States on February 18, 2026
Y
Verified Purchase
YetAnotherITGuy
Dallas, US
★★★★★ 5
works as advertised!
Size: 1 Count (Pack of 1)
I purchased this kit to renew the headlights on my 2016 Nissan Frontier pick-up. The headlights had become slightly oxidized and dull -- not that bad but it was bothering me and for the price of the kit I figured it was worth the effort to attempt to renew them. All I can say is -- WOW, what a difference. The end result looked like new -- clean, brilliant and bright. Read the directions (2 or 3 times) and follow them EXACTLY. Total time for me from opening the kit to being done was about 2 hours and I was taking my time. This kit is different in that the final step applies a UV resistant coating which really makes the glass super transparent. Great investment in the time and money. I can't stop admiring my new (old) headlights!
WAS THIS REVIEW HELPFUL?YesReportShare
Reviewed in the United States on May 14, 2026

recommand products