Pay in installments of $6.26 with
 ,
,
 and
and

Shipping Estimate
USA
- USA
- CAN
- USA
- CAN
Ships within 48 hours · Estimated delivery Aug 9 - Aug 14
 Promo Codes Available:
For Your Every Summer RSVP, with Code: SUMMER15
Description
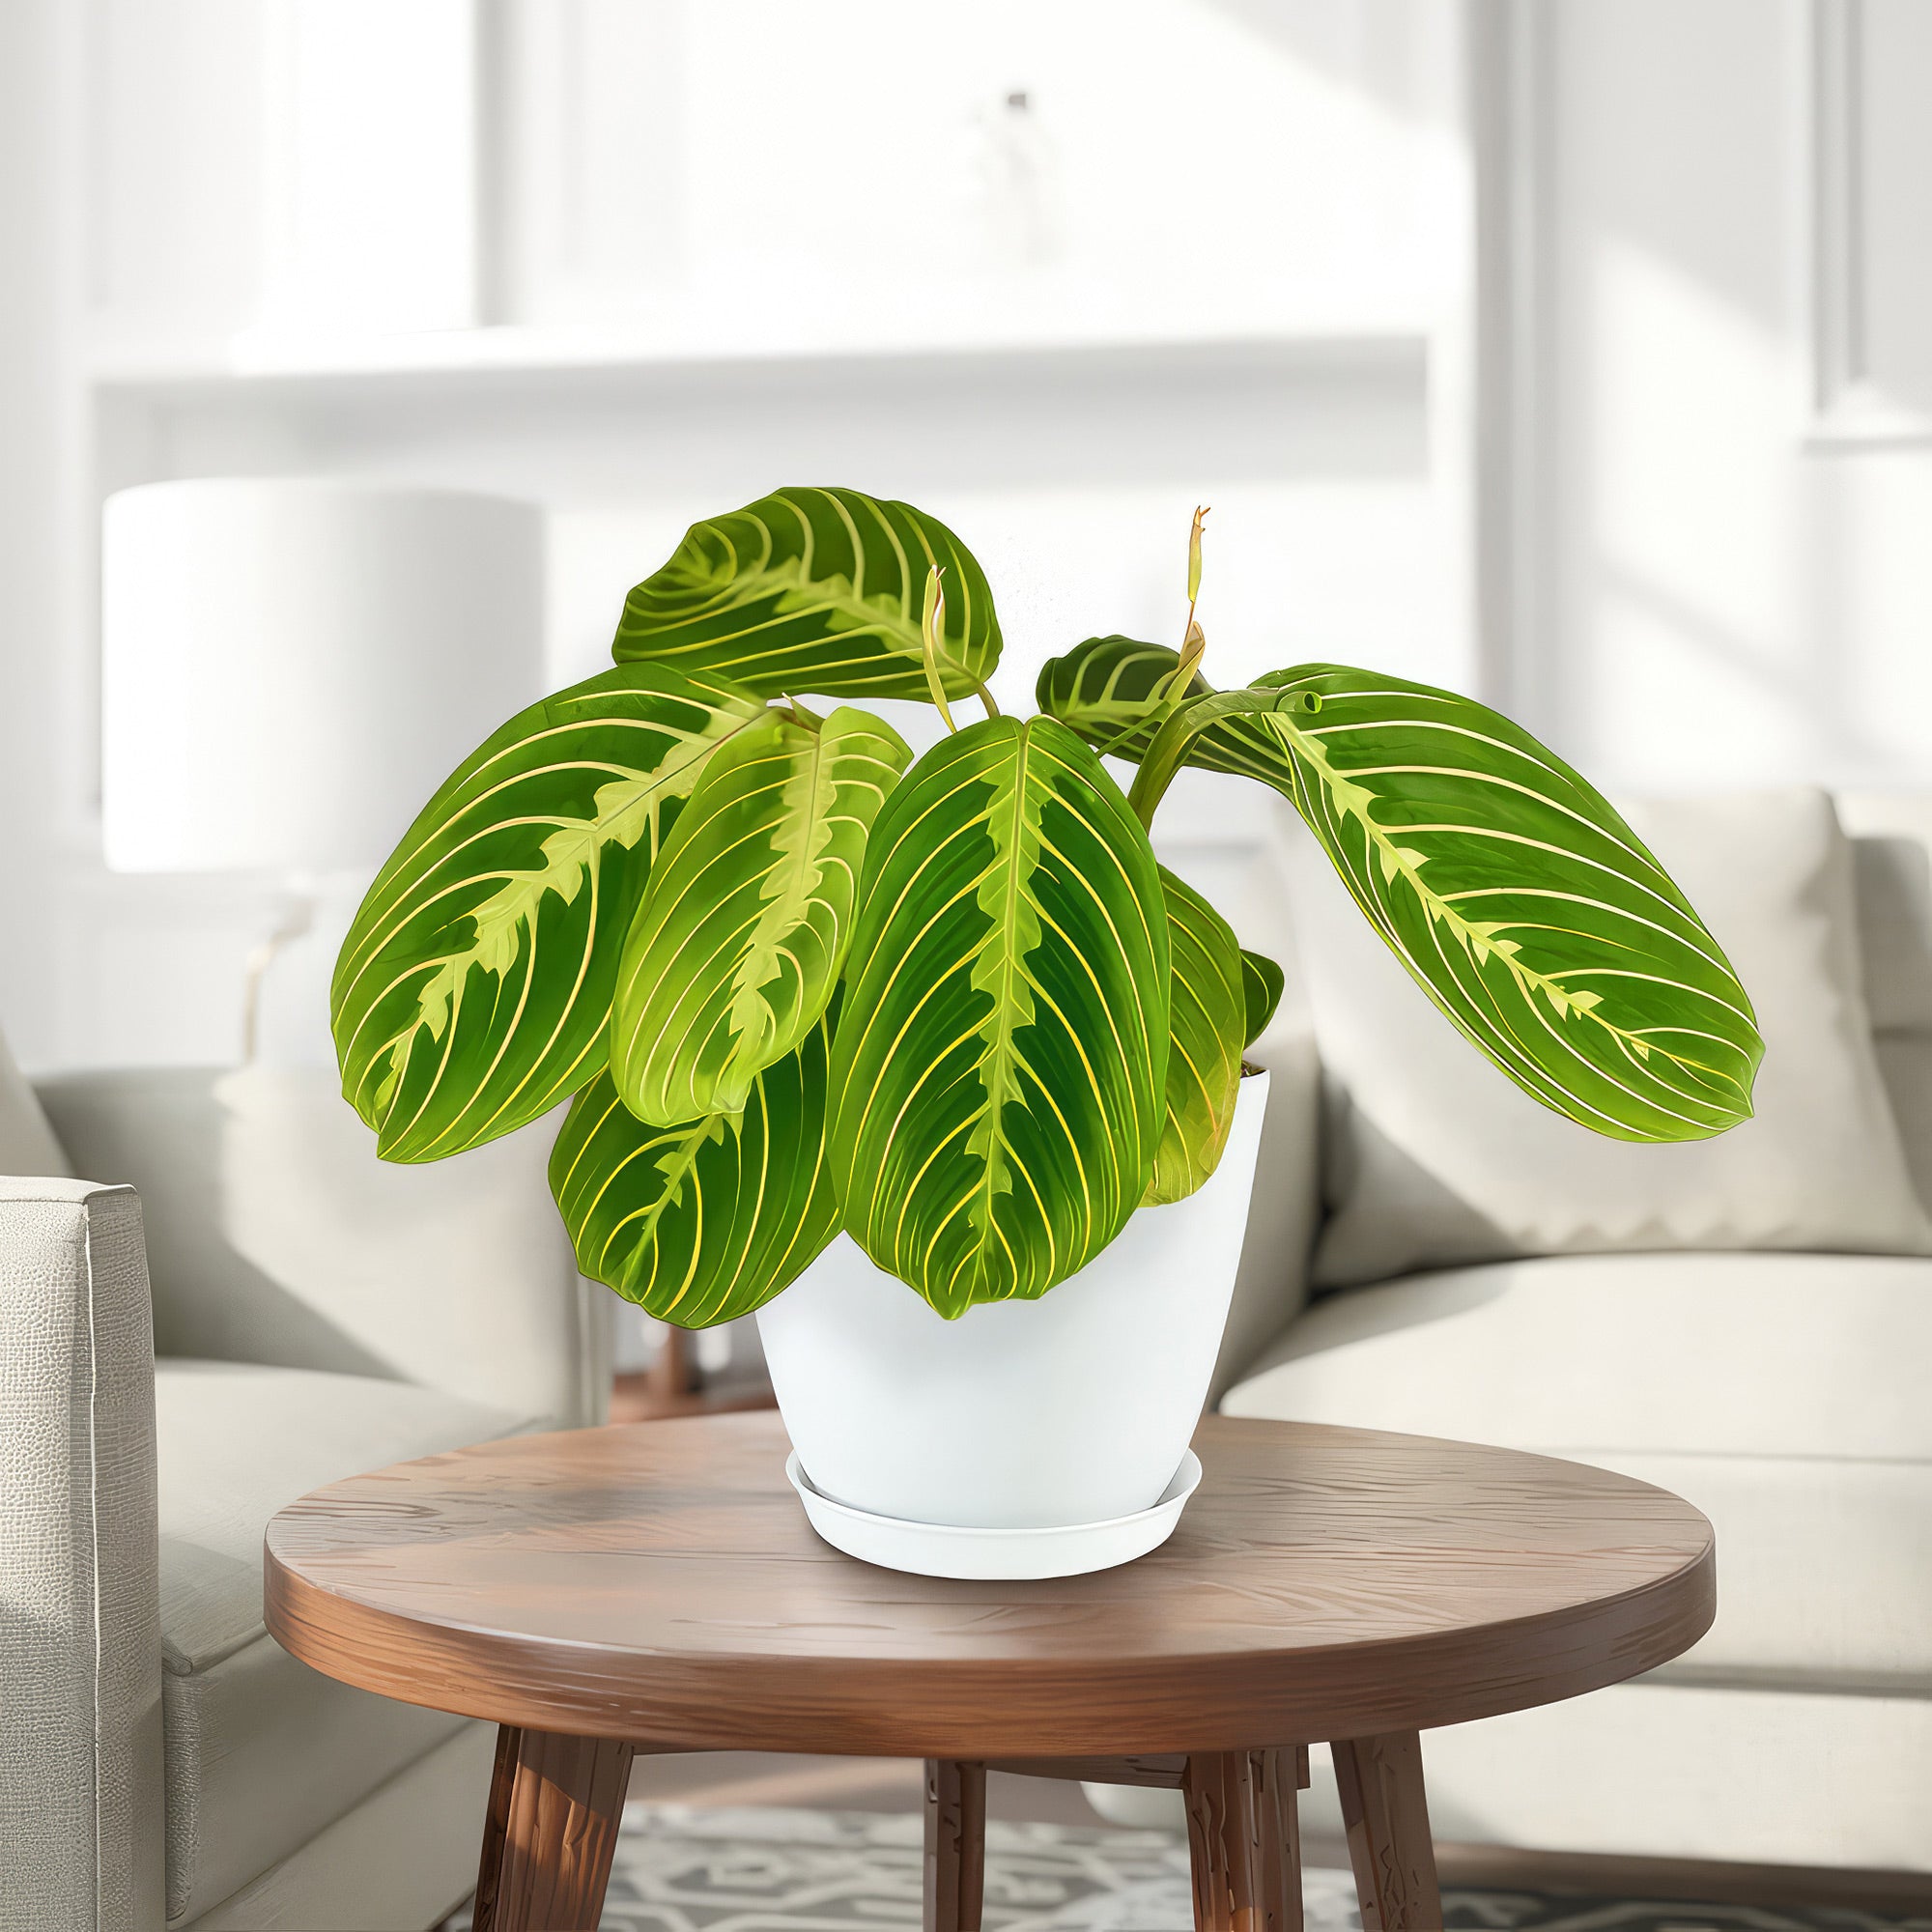
a prayer plant Lemon Lime Maranta ‘Lemon Lime Prayer Plant’ 8" Pot / Black / With PotThe Lemon Lime Maranta, known as the Lemon Lime Prayer Plant, is a unique and vibrant variety of the Maranta leuconeura which is the main Prayer plant, beloved for its striking foliage and low growing, tropical appeal. This plant derives its common name from the vivid lemon and lime hues that streak across its leaves in delicate, vein like patterns. As a member of the prayer plant family, the leaves of Maranta leuconeura lemon lime move with the
The Lemon Lime Maranta, known as the Lemon Lime Prayer Plant, is a unique and vibrant variety of the Maranta leuconeura which is the main Prayer plant, beloved for its striking foliage and low-growing, tropical appeal. This plant derives its common name from the vivid lemon and lime hues that streak across its leaves in delicate, vein-like patterns.
As a member of the prayer plant family, the leaves of Maranta leuconeura ‘lemon lime’ move with the light, folding up in the evening in a gesture that resembles hands clasped in prayer. With its eye-catching colors and fascinating leaf movement, the Lemon Lime Maranta is a popular houseplant, providing visual interest and a touch of exotic indoor spaces.
Native to the tropical forests of Central and South America, the lemon-lime prayer plant features lively, variegated foliage that displays movement throughout the day.
Its oval-shaped leaves showcase soft, symmetrical patterns of veining, with a mix of pale yellow, lime green, and deeper green tones. It can grow up to 12 inches tall and 12 inches wide. This makes them an ideal size for tabletops, shelves, or smaller plant stands, where they can add a burst of color without overwhelming a space.
The plant’s relatively low-growing nature and full, bushy appearance make it a fantastic option for filling smaller spaces with lush, tropical greenery.
The undersides of the leaves have a reddish-purple tint, adding an extra layer of visual appeal. The plant’s leaves respond to light by adjusting their position: they lower and spread outward in daylight and lift to an upright, closed position at night, a movement known as “nyctinasty.”
The Lemon lime Maranta flowers are typically white or light lavender and grow on slender stalks, emerging in clusters above the leaves during the spring. Though the flowers are subtle compared to the vibrant foliage, they add a charming touch when they appear. However, flowering is more common outdoors or under ideal humidity and light conditions indoors.
In its native habitat, it grows as a ground cover, spreading low along the forest floor under the shade of taller trees. This preference for humidity and indirect light makes it ideal for indoor environments that can mimic these conditions. As an indoor plant, it’s accustomed to low light and doesn’t require direct sun, making it a versatile choice for many home settings.
When and How to Water Your Lemon Lime Prayer Plant
The Lemon Lime Maranta is a drought-resistant plant, preferring consistently moist soil to thrive. Unlike hardy plants that can withstand dry spells, the Lemon Lime Maranta requires careful attention to its watering needs.
In the spring and early fall, during the growing season, the Lemon Lime Maranta requires more frequent watering to support its vibrant foliage and new growth. At this time, water it about once every 5–7 days or whenever the top inch of soil begins to feel dry to the touch. It's essential to water thoroughly, ensuring that moisture reaches the roots. However, avoid letting the plant sit in water, as it dislikes soggy conditions and can suffer from root issues if left overly wet.
In late fall and winter, as the plant enters its dormant period in the cooler months, its water needs decrease. Watering can be spaced out every 10–14 days, depending on the humidity and indoor temperature. Keep an eye on the soil’s top layer, and only water once it feels dry to the touch. This reduced frequency allows the plant to rest without becoming dehydrated, as the Lemon Lime Maranta conserves its energy during this time.
Using distilled or filtered water is recommended, as Marantas are sensitive to minerals and chemicals commonly found in tap water. Chemicals like fluoride can cause leaf tip browning or yellowing. Distilled water helps you maintain the vibrant leaf color without risking potential buildup issues, ensuring that your Maranta continues to look healthy and stunning year-round.
Light Requirements – Where to Place Your Lemon Lime Maranta
When grown indoors as a houseplant, the Lemon Lime Maranta thrives in low to medium indirect light for at least 4 to 6 hours, making it an excellent houseplant for rooms without direct sunlight exposure. Place them near a window where they can receive filtered sunlight or in a location with artificial light sources, such as fluorescent or grow lights.
Direct sunlight can scorch the delicate leaves of the plant, so it's essential to protect them from harsh rays. Rotating the plant occasionally can ensure even light exposure on all sides, promoting uniform growth and preventing leggy growth due to reaching for light.
For outdoor growth, select a shaded or partially shaded spot. These plants prefer dappled sunlight or areas with indirect light to prevent leaf burning and maintain their vibrant colors.
Avoid placing them in the full sun, as excessive sunlight can cause leaf damage and stress the plant. When transitioning your plant outdoors, acclimate it gradually to the increased light levels to prevent shock.
Providing a sheltered outdoor location with gentle morning sunlight or filtered light throughout the day can create vibrant foliage.
Optimal Soil & Fertilizer Needs
When selecting soil for your Maranta lemon lime plant, it's best to choose a well-draining potting mix rich in organic matter. A mix designed for tropical plants, or a combination of peat moss, perlite, and compost can provide the right balance of moisture retention and drainage. Avoid heavy soils that can lead to waterlogged conditions, which may harm the plant's roots. Planet Desert has specialized potting soil, opens in a new tab that includes an organic substrate with mycorrhizae to help with the growth of a healthy root system to help your lemon lime prayer plant to thrive. Repotting the plant every couple of years can also refresh the soil and provide necessary nutrients for continued growth.
The Lemon Lime prayer plant benefits from water-soluble NPK fertilizer with an equal ratio of about 5-10-5, once a year from spring through early fall. Avoid over-fertilizing, as this can cause salt buildup in the soil and lead to nutrient imbalances. During the plant's dormant period in winter, reduce or stop fertilization to allow the plant to rest. Observing the plant's growth and adjusting the fertilizer regimen accordingly can help maintain its health and vibrancy.
Following the instructions on the fertilizer package regarding dilution and frequency of application is essential to prevent fertilizer burn and support balanced growth.
Hardiness Zones & More
When growing the Lemon Lime prayer plant indoors as a houseplant, it thrives in average room temperatures ranging from 65°F to 80°F. Maintaining a consistent temperature within this range is essential for the plant's overall health and growth. Avoid placing the plant near drafts, air conditioning vents, or heating sources that can cause temperature fluctuations and stress the plant. Providing a stable temperature environment can help the plant flourish and prevent issues such as leaf curling or browning. When grown indoors, especially in environments with dry air, increasing humidity around the plant can promote healthy growth and prevent issues like leaf browning or crispy edges. You can boost humidity by placing a humidifier near the plant, grouping plants together to create a microclimate, or using a pebble tray filled with water.
For outdoor growth, the Lemon Lime prayer plant is typically suited for USDA zones 11 and 12, where temperatures remain consistently warm throughout the year. These zones generally experience mild winters with minimal risk of frost, which is crucial for tropical plants like the Lemon Lime prayer plant.
In tropical or subtropical regions with naturally high humidity, the plant can benefit from the ambient moisture in the air to maintain its lush appearance and vibrant foliage. If you live in a region outside these zones, consider growing the plant in containers that can be brought indoors during colder months to protect it from low temperatures and frost damage.
Wildlife – Lemon Lime Maranta Attracts the Following Friendly Pollinators
The flowers of the Lemon Lime Maranta plant are known to attract pollinators and insects through their unique characteristics. These flowers often have bright colors or intricate patterns that act as visual cues to attract pollinators like bees, butterflies, and hummingbirds.
Toxicity: According to the ASPCA, the Lemon Lime prayer plant is considered non-toxic to cats, dogs, horses, and humans. It is a safe choice for households with pets, providing a touch of greenery without posing a significant risk to animal companions.
How to Propagate Your Lemon Lime Prayer Plant
To propagate your Lemon Lime prayer plant, you can use stem cuttings. Here's how to do it: Select a healthy stem with several leaves and cut it just below a leaf node. Remove the lower leaves to expose the node where roots will develop. Place the cutting in water or a well-draining soil mix, ensuring the node is submerged or in contact with the soil. Keep the cutting in a warm, humid environment with indirect sunlight and regularly mist the plant to maintain moisture levels. Over time, roots will develop, and you'll notice new growth indicating successful propagation. Once the roots are established, you can transplant the cutting into a separate pot for further growth.
Key Takeaways
- The Lemon Lime Maranta thrives in low to medium indirect light, making it an excellent houseplant for rooms without direct sunlight exposure.
- It is known for its vibrant lemon and lime green vein patterns on deep green leaves, that add striking color and visual interest to any indoor space.
- Like other prayer plants, its leaves move throughout the day, opening in the morning and folding up at night, creating a unique and dynamic display.
- It grows to about 12 inches in height, making it an ideal tabletop plant that fits easily in smaller spaces without overwhelming the area.
- This plant thrives in higher humidity levels, which makes it an excellent choice for bathrooms or rooms where humidity can be easily maintained.
The Bottom Line
Overall, the Lemon Lime Maranta is a popular houseplant, celebrated for its intricate leaf patterns and the unique way its leaves shift with the light, bringing dynamic movement and vibrant color to indoor spaces. Its lush foliage displays a tapestry of greens and yellows, and with occasional care, it thrives in moderate to low light. This plant prefers consistently moist, well-draining soil and high humidity, mimicking its native tropical habitat. While relatively low-maintenance, it benefits from regular misting and distilled water to keep its colors vivid and prevent mineral buildup, making the Lemon Lime Maranta an ideal choice for those seeking an exotic, eye-catching addition to their indoor plant collection. Order your very own lemon-lime prayer plant for sale today!
Shipping Notes
- Free Standard Shipping on $100+ Orders to the USA.
- Except Preorder products are shipped in 48 hours.
- Delivery to the USA:
- Standard Shipping : 3-10 business days
- If time is of the essence, please consider selecting expedited delivery for faster service.
Exchange/Return Notes
- We offer a 30-day return/exchange service after receiving.
- Final sale items are not eligible for returns or exchanges.
- To process your return/exchange, please contact us at [email protected]
- Please click here for more details>>> Return & Exchange Policy