Pay in installments of $5.66 with
 ,
,
 and
and

Shipping Estimate
USA
- USA
- CAN
- USA
- CAN
Ships within 48 hours · Estimated delivery Aug 6 - Aug 11
 Promo Codes Available:
For Your Every Summer RSVP, with Code: SUMMER15
Description
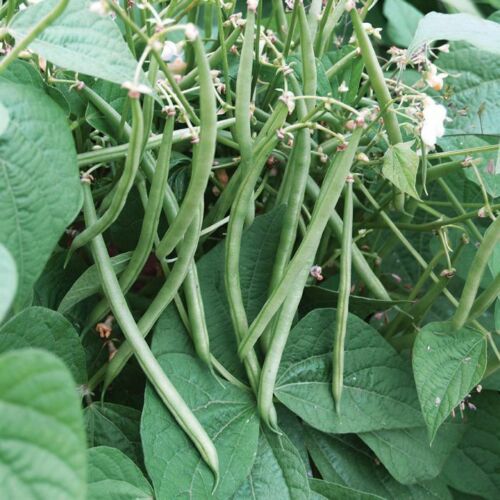
best green bean seeds to plant Improved Tendergreen Green Bean Seeds - For 2026 Planting DownyImproved Tendergreen Green Bean is a classic bush bean variety celebrated for its outstanding productivity, rich flavor, and crisp texture. This high yielding producer of 6 7 inch long green beans is a longtime favorite, producing heavy and prolonged yields. Improved Tendergreen plants are compact and easy to grow, making them a perfect choice for small gardens, raised beds, and even container gardening. They produce an abundance of smooth, tender
Improved Tendergreen Green Bean is a classic bush bean variety celebrated for its outstanding productivity, rich flavor, and crisp texture. This high-yielding producer of 6-7 inch long green beans is a longtime favorite, producing heavy and prolonged yields. Improved Tendergreen plants are compact and easy to grow, making them a perfect choice for small gardens, raised beds, and even container gardening. They produce an abundance of smooth, tender pods that are stringless and perfect for fresh eating, steaming, sauteing, or preserving. Known for their disease resistance and adaptability to various climates, these beans thrive in a range of conditions, ensuring a reliable and plentiful harvest. Their quick maturation allows for multiple plantings in one season, keeping your garden productive and your table stocked with fresh, delicious beans. With a flavor that shines in any recipe and a low-maintenance growing habit, Improved Tendergreen Green Beans are a fantastic addition to any home garden.Also Known As: Improved Tendergreen Bean, Tendergreen Bush Bean, Tendergreen Snap Bean, Tendergreen Green Bean.
| Plant Name: | Bean, Improved Tendergreen |
| Latin Name: | Phaseolus vulgarus |
| Days to Germinate: | 6-10 |
| Days to Harvest: | 52 |
| Plant Height: | 18 - 24 Inches |
| Spread: | 12 - 18 Inches |
| Growth Habit: | Bush |
| USDA Zones: | 3-11 |
| Lifespan: | Annual |
| Brand: | TomorrowSeeds |
| Sunlight: | Full Sun, Partial Shade |
| Pollination: | Heirloom, Open-Pollinated |
| GMO: | No |
| Fungicide-Treated Seeds*: | No |
| Seeds Packed For**: | 2026 |
**Seeds are freshly packed for the growing season of the year listed. Seeds are still viable beyond pack date. Store in a cool and dry location such as the refrigerator or basement to best preserve germination rates.
Planting Instructions:
Soil Preparation:
Choose an area with heavy, well-draining soil that receives at least 6 hours of sunlight each day. Remove weeds, large rocks, and litter from the planting area. Leave small weeds and dead grass, they will enrich the soil when turned under. Spade or till the soil 8-12 inches deep. Loosening the soil will help the plant establish strong roots.
Plants grow best in soil with lots of organic matter. You may optionally add fertilizer or organic material such as compost, leaves, or rotted hay to mix into the soil at this point. For small gardens, scatter 2-3 tablespoons of a low-nitrogen fertilizer evenly and work into the top 2-3 inches of soil for each hill or 2 foot by 2 foot planting area. For larger gardens, scatter 2-3 pounds of a low-nitrogen fertilizer for each 100 square feet of planting area. Work fertilizer or organic material into the soil and leave the surface smooth.
Form rows of soil beds 4-6 inches high and at least 18 inches apart. This formation of ridges will help with drainage.
Planting:
Green beans grow best in temperatures between 65F-85F. Direct-sowing is recommended. Plant green beans in the spring after all danger of frost has passed and the soil temperature reaches at least 60F. For fall crops, direct sow seeds outdoors 7-9 weeks before the first frost. To plant, make holes 1 inch deep and spaced 4 inches apart down the rows of raised beds. Plant 1 seed per hole. If choosing to thin to the strongest plant, plant 2-3 seeds per hole, determine the strongest and healthiest plant, then remove all other plants, narrowing to a single plant per hole. Cover seeds thinly with soil and water after planting.| Planting Depth: | 1 inch |
| Within-Row Spacing: | 4 inches |
| Between-Row Spacing: | 18-24 inches |
Care During the Season:
Watering: Water the plants deeply, soaking the soil to a depth of 6-8 inches, once a week. If there is no rainfall, water 2-3 times a week. Water especially during flowering and pod formation. Sandy soils may need to be watered more often than heavy clay soils. Mulching around plants can help retain moisture.
Weeding: Keeping plants weed-free improves production. If plowing or hoeing, do not dig deeper than 1 inch to prevent from cutting the feeder roots.
Fertilizing: Once plants start forming pods, you may optionally apply 2 tablespoons of a low-nitrogen fertilizer around each hole, or 1-2 pounds per 100 square feet, without letting the fertilizer touch the plants. Water plants after fertilizing.
Insecticides: Insecticides may be used to protect plants. Bt-based insecticides and sulfur are organic options that can be used for prevention. Sulfur also has fungicidal properties and helps in controlling many diseases. Before using a pesticide, read the label and follow cautions, warnings and directions.
Diseases: If spots or mold appear, treat plants with an approved fungicide. Neem oil, sulfur, and other fungicides may be used. When using fungicides always follow label directions.
Harvesting:
Green Beans can be harvested when the pods are firm, well-filled, and still tender, but before they become too mature and tough, about 50-60 days after planting. For the best flavor and texture, harvest green beans when they are young and the seeds inside have not yet fully developed. The beans should be bright and crisp, and the pods should snap easily when bent. To harvest, gently pick the beans by hand or use garden shears to cut the stem, leaving the pod intact. Be sure to harvest regularly, as this encourages the plant to continue producing more beans. If beans are left too long on the plant, they can become tough and stringy. Green beans can be eaten fresh, frozen for later use, or preserved through canning.
Shipping Notes
- Free Standard Shipping on $100+ Orders to the USA.
- Except Preorder products are shipped in 48 hours.
- Delivery to the USA:
- Standard Shipping : 3-10 business days
- If time is of the essence, please consider selecting expedited delivery for faster service.
Exchange/Return Notes
- We offer a 30-day return/exchange service after receiving.
- Final sale items are not eligible for returns or exchanges.
- To process your return/exchange, please contact us at [email protected]
- Please click here for more details>>> Return & Exchange Policy